Showing posts with label Tyler Smith. Show all posts

Monday, March 21, 2011

Mdina Archives 3D Cistern Visualization

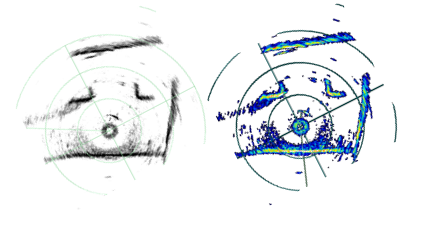
On Wednesday (3/16/11), we went to Mdina to explore another cistern at The Archives of the Cathedral of Malta. This cistern was especially interesting because of its shape. The cistern consisted of a shaft down the center and two bell-shaped cisterns branching off. The smaller cistern's access point was at about 16 meters underwater down the shaft, while the larger cistern's access point was at about 22 meters down the shaft. Gathering enough sonar data for this cistern was very difficult due to the complexity of two cisterns in one. It was difficult to navigate between cisterns through the shaft while keeping track of the distance moved and the orientation of the ROV. We collected 50 sonar scans in all where 15 of them where side-scans. (The sonar was rotated sideways to collect vertical data of the cisterns).

Over the past few days, Chris and I have been analyzing this data and creating sonar mosaics (the compilation of multiple sonar scans to create a map) in order to create a 3D map of the entire cistern. So far, we have created a 3D map and now I am handing it off to Christina for her to transform it into a pretty 3D visualization. The image below represents a map of the entire cistern, which includes both of the sub-cisterns. (This is before Christina's visualizations). You can see the smaller cistern on the left that branches out from the shaft and the larger cistern is on the right. This map was generated with the sonar data using the sonar mosaics to calculate the ROV position at each of the scans and also SLAM (Simultaneous Localization and Mapping) to help better align the individual scans.

Data Processing!

After a few weeks of gathering huge amounts of raw video data it's crunch time! On the left is a computer being used to edit the massive amount of video collected by the ROV into small ~1-4 minute representations of each cistern. Billy, as seen on the right, is creating a 3D map of a cistern with a program he coded almost from scratch.
Some of the challenges I have found with editing the video is a lack of clear video as well as video that shows the ROV moving around the cistern in a fashion that allows anyone to understand where they are in relation to the starting point. Luckily, we have managed to collect so much video that I have been able to splice together many of the video files to create a short and cohesive video for most of the cistern locations we have visited.


Billy and I working side-by-side pushing through all of the collected data


Creating a video of the inside of a cistern by piecing together smaller portions of video taken by the ROV.


Timmy can win a singing contest using sign language.

Saturday, March 19, 2011

Underwater Roboticists Unplugged

Snorkeling Day 1

On Chris's last day we decided to be a bit more adventurous than usual. Chris really wanted to go swimming in the Mediterranean and what a better way to enjoy the beautiful weather than laying out on the beach and snorkeling for a few hours. The scenery was picturesque with clear shallow water surrounded by a bright blue sky. The best part of snorkeling was not the wildlife in the water (as there was about 2 fish that I saw) but spending a good length of time enjoying our surroundings both above and below the water. A good chunk of the time we spent in the water was laying on our backs while floating in the water, enjoying each others company, and taking everything in. It was truly a unique experience.

Exploring the Mediterranean

Postcard worthy view of the beautiful underwater landscape

Putting on the flippers!

Laying back and enjoying the view

Up-close and personal looking up at the bright blue sky

Acrobatics underwater

Enjoying the warm, clear waters of the Mediterranean.


The saying,"A picture is worth a thousand words" couldn't be more true in this picture.

Friday, March 18, 2011

Inspiring the Next Generation - Teaching Robotics

Part of the ICEX goals this year have been reaching out to elementary school aged children and introducing them to robotics and inspiring them to go into science and technology fields. During the quarter back at Cal Poly, we visited two different 2nd grade classrooms at Pacheco elementary school every Wednesday. We switched off between the classrooms and had hands-on lessons that talked about design, testing and programming. It was very successful. The kids seemed to really enjoy it and retain a lot of what we taught. We even got a book of thank you notes written by all the students afterward – a nice touch.

Originally, that was going to be the extent of our outreach. At the suggestion of Timmy though, we packed a suitcase full of little robots so we could continue the lessons at several Maltese grade schools. We started off with a brief lecture about different types of robots and introduced the robots we brought and the paper disks used to program them.

The disks we used were small circular pieces of paper (that we had to individually cut out beforehand). The robots have two sensors that read the disk as it rotates and determines if the 2 rows of squares are black or white. Depending on the combination of black and white, the robot will go forward, stop, or turn left or right.

We then broke the students into groups of 3-4 and let them each “program” the robot to navigate a simple maze we created on the floor with tape by coloring disks with black pencils and pens. Overall, the students were very excited about it and there were several students who even inquired about where they could get their own robot so they could do more on their own.

It was encouraging to be so enthusiastically received by both the students and faculty of the schools and in addition to being a good educational experience for the students there, it was a great experience for the ICEX team as well to be able to talk with so many students (who represented a variety of ethnic backgrounds).

Wednesday, March 16, 2011

New Toys!

After experiencing so many technical difficulties with our ROV, we got a new toy on Monday! We're not quite sure how he did it (most of us are speculating on superpowers), but Dr. Clark was able to get together enough money to buy a new ROV and ship it to Malta. The new ROV is looking slick, but more importantly it came with a working cable (although it's not as long as our previous cable, it is long enough for most sites, is not attached to the carrying case, and can be attached to an older cable to add length), a much larger monitor (the older ones are about 6in while the new one is about 15in), and a new working depth sensor. What does that mean!? Depth measurements and 3D data! YAY! After tearing through the packaging like a kid on Christmas, we decided to test out the new ROV on the cave near St. George's Bay since our previous readings could be improved upon (and because the cave is just that cool).


Tuesday was fun, too! In groups we all climbed aboard the Isis II (a boat) to check out a WWII shipwreck in the bay. The team took turns visiting the site in groups of 2 or 3 and each member took a turn driving a much larger ROV around the shipwreck. It handled differently from our VideoRay and had a longer response time, but a few quick minutes of practice proved to be enough (at least, for our purposes). There were also some divers who happened to be in the area. They were supposed to be on one side of the wreck while we would stay on the other, but slowly during my turn they crept over to our side. This was a little thrilling as I didn't want to slam the very expensive equipment I was controlling into anyone and they came in rather quickly. Fortunately, I was able to keep my distance while not losing sight of the wreck until I was done. We then surfaced the robot and reeled it in with a crane (much easier than pulling it out by hand) and headed back to the dock. And while I am excited for the new VideoRay, it was a great treat to be able to use this other ROV.

Friday, March 11, 2011

(More?) Hardware Repair

So we decided to stay home on Thursday (March 10th) after running into some hardware troubles on Wednesday and ended up getting a lot of troubleshooting done. Our major goals for the day were making the partial ROV water-proof so that we could check its depth sensor in our makeshift pool (a large trashcan), checking the depth sensor of the full ROV, and doing some work on one of our tethers so that we could get full communication with the ROV (one of the problems we experienced Wednesday).

Tyler and I worked with the ROV and Brig and Jeff took on the tether job. We hoped to meet up later in the day to connect the 2 hopefully-fixed pieces of hardware. Tyler and I put the trashcan into the shower and filled it up with water.

We waterproofed the partial ROV and put it in the water for the first time since we've been here in Malta (we had been primarily using it for parts). We used both ROVs and both of our control boxes to test the depth sensors. We received inconsistent readings of depth on the control boxes, and could not communicate with the sonar unit at all. After some testing, we took a break and got some McDonald's coffee down the road. We were even graced by Timmy's presence midway through our day.

Jeff came down and finished up splicing the new piece of the tether together so that we could combine our jobs from the day.

The fixed tether solved the sonar communication problem completely! We now knew that the problem was in the other tether (the one not spliced) so we could now actually get sonar data from the cave! We also tested both cables connected in tandem so that we might be able to get some extra length in the huge cave. The cables connected and were able to control the ROV, but we still did not have sonar communication, which again assured us that the error was within the tether.

The final step was to waterproof the new connection. This required wrapping each connection in electrical tape to prevent shorts, sealing all the connections with epoxy, heat shrinking the epoxy, covering this in a sturdy hose-like wrap, and finally epoxying the ends of the cover.


By the end of the day, the ROVs were back together and waterproofed, and the tether could now communicate with the sonar. Although we lost a day at the cave, we were able to successfully remedy some major problems, and the entire team felt like it was a good choice.

Wednesday, March 9, 2011

Gozo

In addition to collecting information at various sites throughout Malta, we’ve been able to go to several sites on the smaller island of Gozo. Gozo is only 14km long and 7km wide and has approximately 31,000 residents. It is known as being much more green compared to Malta and the industry is more focused around agriculture. Below is a view over part of the island, as seen from the citadel in Victoria (also called Rabat) which is the capital city of Gozo.

Our sites on Gozo (on Monday) were focused on water galleries (as opposed to cisterns or wells). It was a neat change of pace to see the lay out horizontally instead of relying completely on sonar and video data from the ROV to get an idea of the layout and general structure of the cistern.

We did two sites on Monday. The first one, Ghar Ilma (Water Cave), was at a private residence and was apparently very important in supplying most of the water for the citadel back when residents of Gozo would have to sleep within the protected walls of the citadel (to stay safe from pirate attacks). I was surprised at the extent of this gallery. There were several different passageways and the main one extended for over 900 ft. We collected data for a lot of it, but were unable to map everything due to the limited length of our cable (only 250 ft) and the fact that there was a pile of debris blocking part of the main passageway.

Our second site was another private residence in someone’s garden. We set up in a small grove of tangerine/orange trees and ran the cable down to the water gallery. The depth readings on our control box were still not working properly, but we were able to get good sonar scans for the entire gallery.

After we finished collecting data, we packed up quickly and drove to the ferry in order to catch it on time (so we could meet our driver on the other side at the scheduled time). We got there in time, but almost missed the ferry anyways due to complications getting all of our equipment (a large generator, several large robot boxes, and various other bags and toolboxes) into a luggage container. We did end up making it, enjoyed the beautiful ride back to Malta and concluded another successful day of data collection.

The Art of Sonar Mosaics

Hand-Mapping a cistern using sonar scans can be quite a tedious but rewarding task. After the many hours spent in the field collecting data there is still the sometimes overwhelming task of analyzing 10's of sonar scans for each cistern. To make this job a bit easier, I like to think of each sonar scan as a piece of a puzzle. At first, I am given a number of pieces in the form of sonar scan data for each cistern and it is my job to put them together. Each scan gives a limited visibility of the cistern but with all of the pieces properly placed, a relatively accurate 2D representation of the cistern can be achieved.

Here is a general overview of one of the map-making processes:

First, I open one of the sonar scans and take a screen shot of the entire scan.
A black and white representation of the scan is used to clearly indicate what is a wall, shown in black, and what is water/data that cannot be collected, shown in white.


Next, I crop the screen shot to only show the sonar data and alter the transparency to allow multiple sonar scans to overlap. For this example I have changed the color of the walls to blue to show where this particular scan overlaps in the final map. The image is then rotated to best-fit the current map.

Finally, each useful piece of sonar data is pieced together to form a sonar mosaic of the cistern. This particular mosaic is one of the more recent cisterns we visited in the Wignacourt Museum.


Timmy wins every game of Connect Four in 3 moves.

Saturday, March 5, 2011

Mdina, Round 1

Our site for Wednesday was within the walled city of Mdina (http://en.wikipedia.org/wiki/Mdina). The first cistern was located in a restaurant called Bacchus, which was not open for the day yet.
This caused our time for exploration to be slightly shortened, as we had to be out before they opened. After arriving, during setup and some of the time spent in the cistern, about half of the team was able to wander around the restaurant with the owner getting a bit of a history lesson. There was much history to discuss since the room was built between 1657 and 1660! Since it was before business hours, many people transporting supplies for Bacchus were filtering in and out of the front entrance where we were located. Many stopped momentarily to see what we were doing, and were very interested in our sonar maps of the underside of the restaurant as well as the images we were receiving from the VideoRay.


In an effort to rotate drivers during different sites, Christina watched closely as I drove the VideoRay through this site so she could become familiar with the logging process and hopefully gather useful data. After gathering data for awhile, the ToughBook lost communication with the control box. After a quick bit of unsuccessful troubleshooting, it was about time to leave, so we headed to the next location.

The next spot was The Mdina Experience, right down the street. There was very limited space here, and it was during normal business hours.


There was actually a tour group passing right through our site when we arrived. They watched as we brought in and setup all of our equipment, but weren't interested enough to ask any questions. We switched to the Samsung backup since we thought the problem was with the ToughBook and did not have time to continue troubleshooting it on-site. Slightly different connections had to be made when using the Samsung, since it lacked a serial port, but everything worked out and we got the VideoRay through the small entrance and into the water.

Space was limited, so team members not directly involved couldn't really be present, so exploration presented itself again!

Another restaurant was our final location of the day. The cistern here was located in the basement. We had to walk through the restaurant which caused for some further stares of the other patrons. There was an extremely narrow passageway leading down to the site, and our equipment had to make it carefully down the long staircase. To add a bit to difficulty, the passageway was lined with wine bottles so there was little room for error. Luckily, Tyler and I made it all the way down successfully.

After making it downstairs and setting up, the data collection process began. Christina drove for for the first time on this site, and did an awesome job grabbing sonar scans and video for the cistern we were on top of. This cistern was composed of a large circular room and a narrow hallway that didn't lead to anything. We ended our day here, and loved the view off the balcony behind the restaurant!

Pressure Problems

Calibrating the ROV depth sensor has been a continuous event throughout our trip. Our excursion to the Mdina cisterns began with an investigation of the local gas station air compressors. Before getting there we were discussing all the different units of pressure that we might run into to preempt converting units if we had limited access to the air compressors. It turns out the common units were lbf/in^2 and Bar. The first gas station had a free air compressor to use but the pressure was no more than ~20 psi but there was no pressure gage to know for sure so we moved on. We found another gas station nearby with an adequate air compressor and the gas attendant was very excited to help us when he saw our robot. The pressure from the air compressor was not high enough and after briefly explaining the problem to the gas attendant he began brainstorming with us on how to solve the problem given the limited equipment we had to work with. After clarifying the problem, he left and came back shortly with a small plastic cap and he began using a knife to take out some of the plastic so it would fit better on the air compressor nozzle. Billy and I fastened the make-shift pressure adapter onto the nozzle and we were able to get the correct pressure to calibrate the ROV. We never knew how exciting it would be to calibrate the ROV (again) and gain so much knowledge about engineering and culture in Malta. Learn by doing at its best!


Chuck Norris jokes are good but Timmy jokes are better simply because Timmy is the subject.

Tuesday, March 1, 2011

A Troublesome Start

Unfortunately, our first technical blog will start a bit dreary. After the hustle and bustle of our many flights, and the changing of connections with our luggage, damage was done to the ROV’s stand. The picture shown below illustrates the complete fracture of the stand in two areas, leaving the stand unstable and hardly strong enough to hold its own weight on dry land. Our second technical problem of the day was also a result of the long journey and the solution to this problem is yet to be solved. One of the control boxes for the ROV no longer shows a display reading any of the crucial coordinates such as compass direction, depth and time. Although these technical problems are certainly not a great way to start our research in Malta, we still maintained high spirits and worked to solve these problems before days end.

Before we could fix these issues we needed to calibrate the depth sensor on the ROV with an air gun to 50 psi. The ROV uses a pressure reading to determine an accurate depth measurement shown in the control box. The problem was we did not have an air gun but luckily Timmy’s close friend Erin was here to help. Erin was kind enough to pick up Joseph and I, along with the ROV, took us to his boat on a small island called Manoel to calibrate the depth sensor. The first obstacle came in the form of a 3 foot gap between the landing and the 1 ft wide ramp leading to the boat with the equipment needed to calibrate the ROV. What would normally be a simple stretch or a light jump became very difficult with a large 45 lb. box holding the cables to the ROV. I almost attempted the jump but realized that would not end well and convinced Erin to dangerously lean over the ramp and grab the box from me. With the first hurdle out of the way we proceeded to calibrate the depth sensor with an air compressor he had on board the boat. Erin did not have the proper fighting to pressurize the small hole in the ROV to 50 psi but with a little ingenuity and some quick thinking by Erin we were able to cut the air hose and create a seal around the pressure sensor. After a few failed attempts at calibrating the pressure sensor, Joe and I timed the air gun to get the pressure coming from the gun to be 50 psi right when Joe pressed the calibrate button, ensuring an accurate calibration. Our test with Erin’s underwater sonar matched the readings we were seeing on the control box ensuring our make-shift calibration was successful. After all the troubles of getting the correct pressure dialed-in, the depth calibration was finally correct but there was still the ROV stand and the control box to fix.

Although our ROV stand was broken, our backup (nonfunctional) ROV became very useful for spare parts and the stability was renewed again when we switched the two stands. We were unable to fix the control box for the time being but we believe it may just be a loose connection and we will investigate this problem as soon as we are able to.


Picture: The ROV's fractured stand (some of us may refer to them as the "legs" of the robot)

Thursday, February 17, 2011

Research Project Discussion at Backstage - 2/15/11

So I got one picture...

Hopefully it's an okay summary of our meeting with Timmy Gambin and the awesome insights he was able to give into our individual research projects and also just some useful general knowledge about Malta.

Can't wait to talk with him more!

Locations of Site Visitors